Key Takeaways
- Daylight Saving Time (DST) is observed in most of Europe, North America, and parts of Asia, South America, and Oceania.
- This practice involves advancing the clocks by one hour during the warmer months and reverting to Standard Time in the fall.
- You can configure your Windows PC to automatically adjust the clock for Daylight Saving Time through the Settings app or the Control Panel.
Remembering to manually adjust the clock for daylight saving time (DST) in the spring and fall can be a hassle. Fortunately, Windows offers a built-in feature that automatically adjusts the clock for DST. Here are a couple of easy ways to enable this feature on your PC.
Adjust the Clock for Daylight Saving Time Using the Settings App
The Settings app is a hub for almost all Windows settings. You can use it to change your PC’s date and time, update the time zone, and perform many other tasks. It also allows you to adjust the Windows clock for daylight saving time. Here’s how to access it.
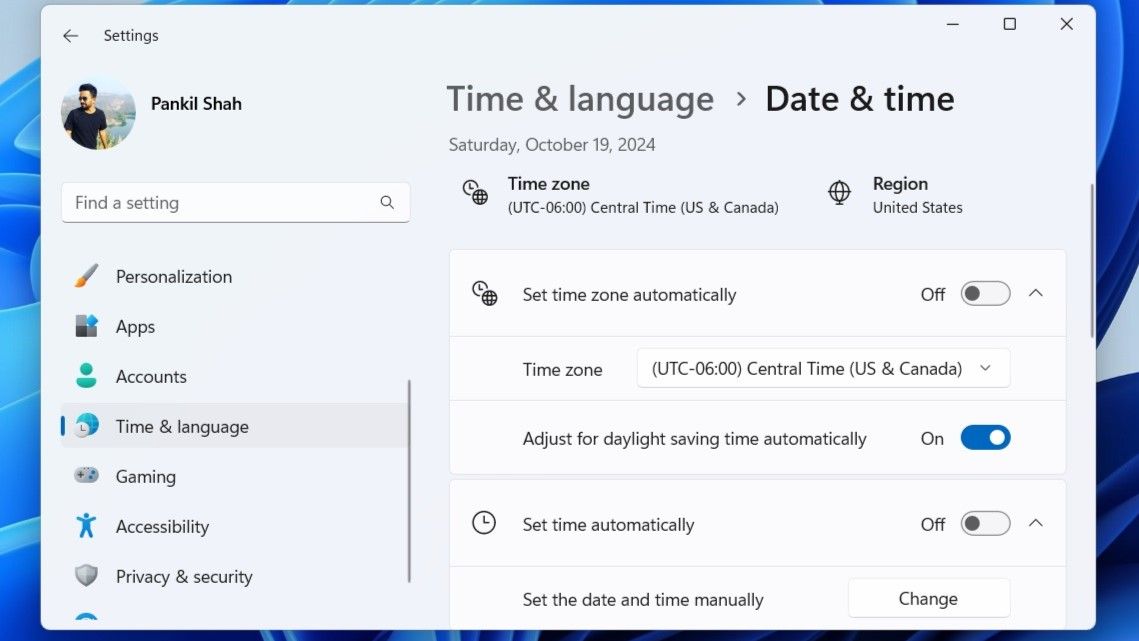
To adjust the clock for daylight saving time on Windows 11:
- Press Win + I to open the Settings app.
- Click Time & language in the sidebar.
- Click Date & time on the right.
- Enable the toggle next to Adjust for daylight saving time automatically.
The process for adjusting the clock for daylight saving time on Windows 10 isn’t all that different. Here are the steps you need to follow.
- Open the Start menu and click the gear-shaped icon to launch the Settings app.
- Click the Time & Language icon.
- Switch to the Date & Time tab using the left pane.
- Enable the toggle next to Adjust for daylight saving time automatically from the right side.
The toggle for
Adjust for daylight saving time automatically
may not appear or could be grayed out if you’ve enabled automatic time zone.
Once you complete the above steps, Windows will automatically adjust the clock for daylight saving time. Further, if you like your date and time in a specific way, the Settings app also lets you change the date and time format on Windows.
Adjust the Clock for Daylight Saving Time via the Control Panel
Although the Settings app lets you manage system settings easily, many users still prefer to use the good old Control Panel to make changes on Windows. If you’re one of them, follow these steps to use the Control Panel to adjust the Windows clock for daylight saving time:
- Press Win + R to open the Run dialog box.
- Type control in the box and press Enter to open the Control Panel window.
- Use the drop-down menu in the top-right corner to change the view type to Large icons.
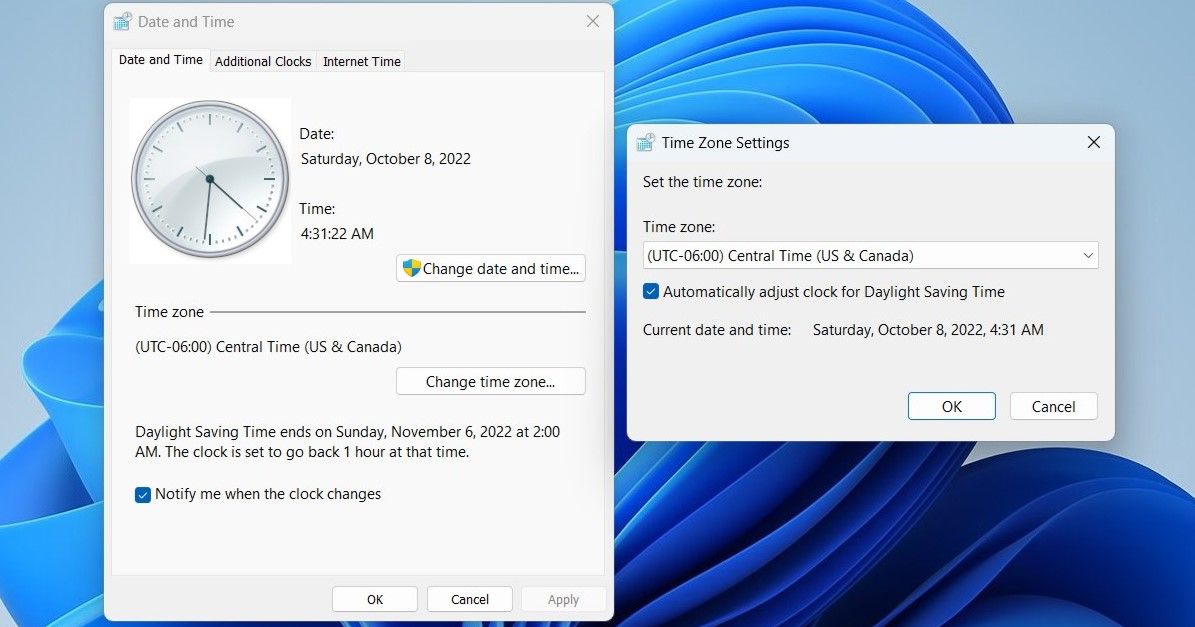
- Click Date and Time. Then, click the Change time zone button.
- Check the Automatically adjust clock for Daylight Saving Time option and click OK to save the changes.
That’s it. Your Windows PC should now adjust the clock automatically for daylight saving time. If you want to disable this feature at any point, follow the same steps above and uncheck the Automatically adjust clock for Daylight Saving Time checkbox.
Although having the wrong time may not seem like a big deal, it’s important to understand that many Windows apps and services rely on your system’s date and time. If your Windows clock is set to an incorrect time, you may experience difficulties connecting to online services and apps. Enabling automatic daylight saving time adjustments can help ensure Windows uses the latest and most accurate time.


